
How to Identify the Parts of a Stove
Not sure what all those stove parts do or which features matter most? You’re not alone—many people struggle to identify burners, controls, vents, and safety components, especially when comparing different models. This guide will help you understand the key parts before choosing the right stove for your kitchen.
Start by scanning the cooktop for burners or heating elements, grates, control knobs and drip pans. Then, note the oven door, handle and viewing window. Check interior racks, lights and vents.
Identify gas parts like valves, igniters and thermocouples or electric parts like coils, insulation and fan vents; induction has hidden coils and pan sensors. Spot controls, displays and safety devices like FFDs or CO alarms.
Keep going to learn cleaning, troubleshooting and when to call a pro.
Knowing how to identify the parts of a stove can make cleaning, troubleshooting, and shopping for a replacement much easier. It also helps you recognize when a problem is simple to fix and when it’s safer to call a professional.
Key Takeaways
- Inspect the cooktop for burners/heating elements, grates, control knobs, and any visible igniters or coil terminals.
- Open the oven door to note the handle, viewing window, temperature dial, interior racks, and oven light.
- Identify fuel-specific parts: gas valves, igniter/pilot, and burner caps for gas, or electric coils and induction coils for electric/induction.
- Check safety devices like flame failure thermocouples, residual-heat indicators, interlocks, and carbon monoxide alarm placement.
- Remove removable parts such as grates, drip pans, knobs, and racks to examine wear, connections, and easy-to-clean components.
Quick Visual Checklist: Labeled Stove Parts and Photos

Want a fast way to recognize each part of your stove? Use a simple labeled-photo checklist you can keep on the fridge. Start with an image showing the cooktop surface, burners or elements, grates, and control knobs—label each clearly so your eyes learn positions and functions at a glance.
Add a photo of the oven door, handle, window, and temperature dial; note where the indicator light and interior racks sit. Include pictures of the vent or hood, drip pans, and igniter or spark modules if visible.
For electric ranges, show the coil connections; for gas ranges, show the burner caps and ports but don’t dive into mechanics here. Pair each photo with short lines on cooking safety and stove maintenance: cleaning frequency, avoiding flammable items, and checking seals or gas smells.
Keep the checklist laminated and review it before tasks; it’s a quick reference that reduces errors and helps you spot issues early.
Gas Cooktop Parts and How They Work
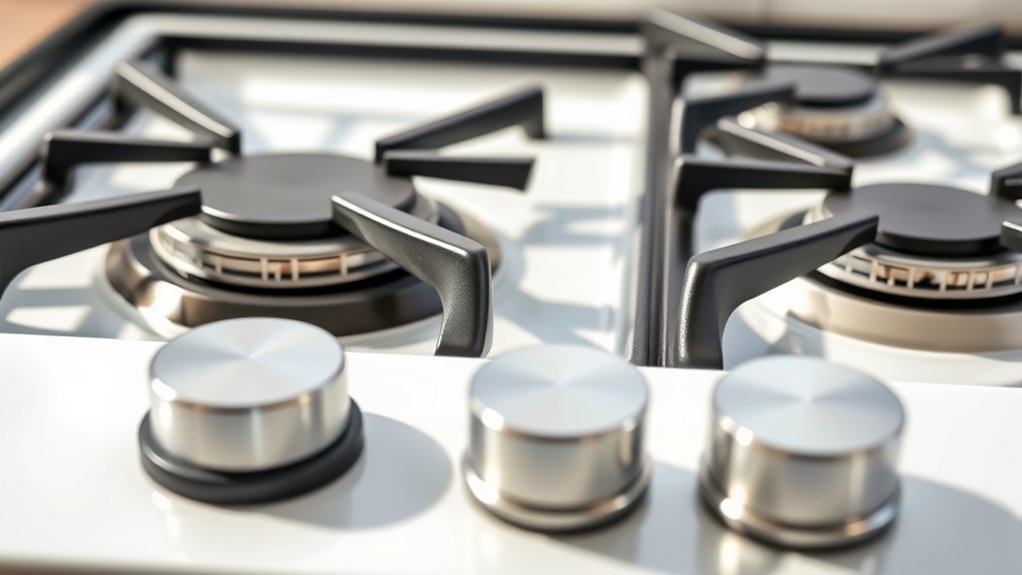
When you turn on a gas cooktop, a few key parts work together to deliver and control the flame. You’ll see knobs that regulate gas flow from the fuel source; turn one and gas moves through the valve to the burner. The igniter or pilot creates the spark to light that gas.
Burner caps and bases shape the flame for even heat, while grates support your cookware. Built-in safety mechanisms, like flame failure devices or thermocouples, shut off gas if the flame goes out.
Burner caps and bases shape even flames while grates support cookware, and safety devices like thermocouples shut off gas if the flame dies.
- Control knobs: adjust flame size and heat output
- Valves and gas lines: deliver the fuel source safely
- Igniter/pilot: initiates combustion
- Burner heads and caps: distribute flame evenly
- Safety mechanisms: prevent gas leaks and shut off flow
You can inspect these parts visually and test knobs and igniters. If anything seems damaged or smells like gas, turn it off and call a technician.
Electric Cooktop Parts and How They Work
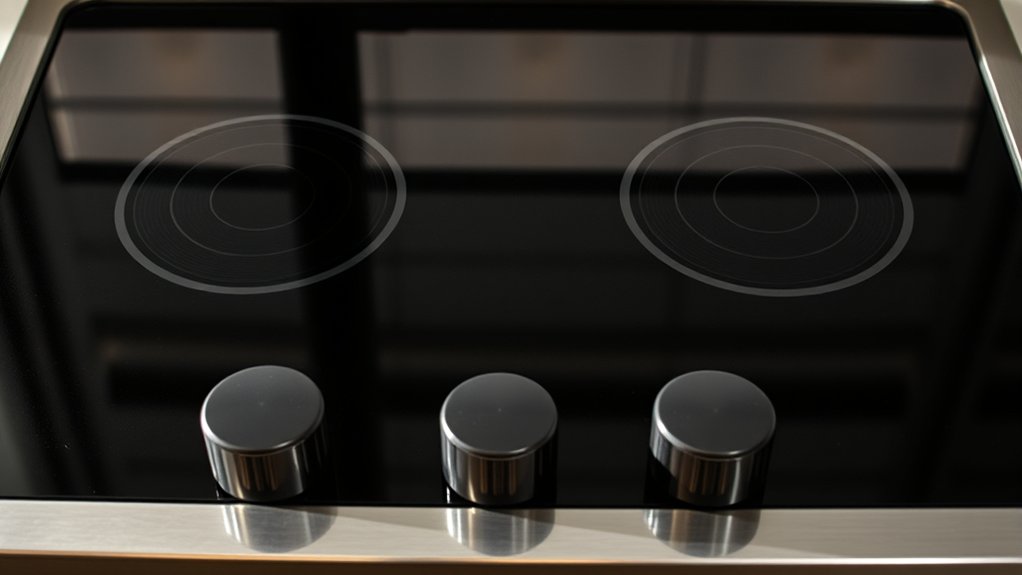
Although electric cooktops don’t use open flames, they rely on a few core parts you can check and maintain. You’ll find coil or radiant elements that convert electricity into heat; coils are exposed and replaceable, while radiant elements sit under a glass-ceramic surface.
Beneath those, element terminals and ceramic insulation link power to the heating element; keep terminals clean to prevent arcing. Controls include knobs or touch sensors and the infinite switch or control board that regulates temperature.
Indicator lights and residual-heat indicators warn you about hot surfaces, which is important for Cooking safety. The drip pans or glass top surface collect spills; wiping them promptly helps Appliance maintenance and prevents staining or sensor interference.
Beneath the cooktop, connection wiring and a junction box feed power; always disconnect power before inspecting. If an element fails, test the terminal continuity with a multimeter or consult a technician.
Regular cleaning, visual checks, and prompt repairs will keep your electric cooktop safe and reliable.
Induction Cooktop Parts and How They Work
If electric cooktops heat with exposed coils or radiant elements, induction takes a different approach by using magnetic fields to heat compatible cookware directly. You’ll find a flat ceramic surface hiding the induction coils beneath; those coils generate alternating magnetic fields that induce currents in ferrous pots, heating the cookware, not the glass. That design changes how you care for and use the stove.
- Glass-ceramic top: smooth surface that’s easy to wipe but needs mild cleaners.
- Induction coils: beneath the top, they create the magnetic field.
- Pan detection sensors: ensure heating only when compatible cookware’s present.
- Cooling fan and vents: protect electronics and prolong life.
- Safety interlocks: automatically shut off for overheating or no-pan conditions.
You should follow Stove maintenance routines to keep vents clear and the surface scratch-free. Because heat’s contained in the pan, Cooking safety improves, but you’ll still watch for hot cookware, avoid metal utensils sliding, and use proper cookware to prevent damage and accidents.
Stove Controls You’ll Use: Knobs, Touchpads, Displays
You’ll use knobs for quick, hands-on control of burner heat and oven settings, so get familiar with the positions for low, medium, and high. Touchpads let you enter precise temperatures and activate features such as the child lock. Displays show the timer, clock, and any error codes at a glance. Once you know where each control is, cooking feels safer and adjustments are quicker.
Knob Functions Explained
When you turn a stove knob, it does more than start a burner. It controls flame or element intensity, enables special functions, and often activates safety features so you can cook precisely and safely.
Knobs let you adjust temperature, select simmer or boost modes, and engage child locks. Proper knob calibration ensures the settings match the actual heat, so test and mark positions if needed.
- Low: maintain a gentle simmer or melt
- Medium: steady cooking or sautéing
- High: rapid boiling or searing
- Special: select oven bake, broil, or convection
- Safety: push-to-turn or lock indicator
Turn knobs smoothly and avoid using force. Replace cracked knobs to keep control accurate and safe.
Touchpad And Display Usage
How do you read and use a stove’s touchpad and display to get consistent results? You’ll rely on the touchpad for mode selection and precise settings; tap or press firmly, avoid moisture, and confirm each input on the display.
If responses feel off, run touchpad calibration following the manual to restore accuracy. Use the display brightness setting to keep readouts visible without glare. Lower it for night cooking and raise it for daylight.
Watch for icons that indicate preheat, lock, or error codes, and learn their meanings so you can react quickly. Clean the surface gently to prevent false touches.
When the touchpad and display operate reliably, your temperature choices and timers stay repeatable, improving your cooking outcomes.
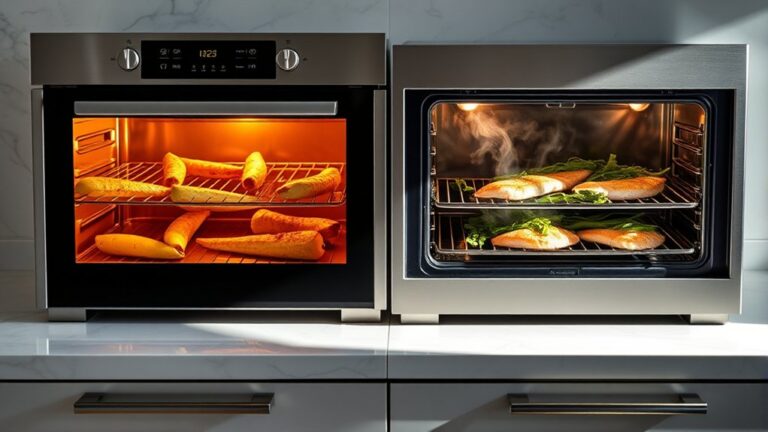
Oven Parts Under the Stovetop: Burners, Racks, Broiler
Beneath the stovetop lies the oven cavity, where burners, racks, and the broiler work together to cook and brown your food. Understanding each part helps you use the oven safely and get consistent results.
Beneath the stovetop, the oven cavity’s burners, racks, and broiler work together to cook and brown reliably.
You’ll find the oven light near the door, so you can check your food’s progress without opening it. The broiler sits at the top of the oven or in a separate compartment and uses intense heat. A broiler pan collects drippings and promotes even browning.
Oven racks slide to adjust the distance from the heat for roasting, baking, or broiling. Surface burners beneath the stovetop supply heat for certain dual-fuel models, while igniters connect to the control system.
- Oven light: inspect and replace bulbs for visibility
- Racks: remove and reposition for different pans
- Burners: check for even flame or heating
- Broiler: preheat briefly for direct high heat
- Broiler pan: use slotted top to drain fat
Familiarity with these parts helps you choose the right configuration for each recipe.
Safety Features and Warning Indicators to Know
When you’re checking a stove, look for safety features such as a flame-failure device, which shuts off the gas if the burner goes out. It’s also helpful to have an overheat indicator light that warns you when temperatures get too high. Finally, make sure there’s a carbon monoxide alarm nearby so you’ll be alerted to any dangerous fumes.
Flame Failure Device
Although you might not notice it at first glance, the flame failure device (FFD) is a critical safety component that shuts off gas flow if a burner’s flame goes out, preventing dangerous leaks and potential fires.
You’ll find the FFD near the burner. It acts as a flame sensor and safety mechanism, sensing heat or ionization to confirm flame presence. If the flame’s absent, the FFD trips the valve closed.
- Detects flame loss quickly
- Prevents unburned gas buildup
- Resets automatically or requires reignition
- Common on gas stoves and ovens
- Simple to test (follow manufacturer steps)
You should inspect it periodically and get professional service if it’s slow or fails to shut gas off.
Overheat Indicator Light
After the flame failure device shuts off gas to prevent leaks, you still need to watch for overheating—another safety risk stoves guard against with an overheat indicator light.
You’ll see a labeled lamp or icon near the control panel that glows when internal temps exceed safe limits, acting as an immediate overheat warning.
Treat it seriously: stop cooking, turn burners off, and let the stove cool.
Frequent triggers may signal poor thermostat calibration or a failing fan or sensor; get those checked by a technician to restore reliable temperature control.
Don’t ignore intermittent lights. Document when they occur and what you were doing.
Proper response and timely service keep your stove safe and help prevent damage or fire.
Carbon Monoxide Alarm
Why should you care about a carbon monoxide alarm on or near your stove? You’ll want one because gas stoves can leak invisible, odorless carbon monoxide, and an alarm gives you early warning so you can act fast. Pay attention to alarm placement: put detectors beside, but not directly above, your stove, and follow manufacturer height guidance.
- Protects occupants by detecting unsafe CO levels
- Alerts you to hidden leaks before symptoms start
- Guides quick evacuation and ventilation actions
- Complements other safety items like range hoods and gas shutoff valves
- Needs regular testing and battery replacement
Install alarms in sleeping areas and near the kitchen. Avoid drafts and vents, and replace units according to the manufacturer’s guidance to ensure reliable protection.
Removable Parts to Clean or Replace and How to Do It
When you’re keeping your stove in good working order, focus on the removable parts—burner grates, drip pans, knobs, burner caps, and oven racks—that collect grease and wear over time; cleaning or replacing these items is usually straightforward and can prevent bigger problems down the line.
Start by removing removable burner caps and detachable drip pans; soak them in hot, soapy water or a vinegar-baking soda solution, then scrub with a non-abrasive pad.
Lift grates and oven racks to clean or run them through a dishwasher if safe. Pull knobs straight off and wipe their shafts; replace cracked or loose knobs.
For electric elements, unplug first, then lift coils gently to access and clean beneath. Inspect burner caps for corrosion or warping and replace if flames are uneven.
Replace heavily stained drip pans and warped grates to maintain heat distribution. After cleaning, dry parts thoroughly, reinstall securely, and test burners to confirm proper operation.
Diagnosing Parts by Sound, Smell, or Behavior
If you hear unusual clicking when the stove is off or cycling, don’t ignore it. The sound could point to a failing ignition switch or a loose relay.
If you notice a persistent burning smell, turn the stove off and check for scorched wiring, trapped food, or a failing heating element. Paying attention to these sounds and smells early can help you identify which parts need repair or a professional inspection.
Unusual Clicking Noises
Although a clicking sound might seem minor, it’s one of the clearest clues about which stove component is misbehaving. By listening closely and noting accompanying smells or actions, you can narrow the problem to parts like the igniter, spark module, or control switch.
You’ll use unusual noises as diagnostic data during appliance troubleshooting. Timing, frequency, and whether clicks happen when burners are off or during ignition tell you a lot. Check for moisture, loose wiring, or failed switches.
If clicks persist after cleaning and drying, suspect an electrical module.
- Rapid, repeated clicks when igniting: wet igniter or stuck electrode
- Single click without spark: faulty spark module
- Intermittent clicks: loose control switch
- Clicks with faint ozone smell: arcing wiring
- Clicks after shutdown: residual capacitor discharge
Persistent Burning Smell
How do you tell whether a persistent burning smell is a harmless residue or a sign of failing parts? You start an odor investigation immediately. Turn off and unplug the stove, then remove grates, burners, and drip pans to check for cooking residue or trapped grease, common smell sources.
Run a quick wipe-down with a degreaser and dry thoroughly, then power the stove briefly to see if the smell returns. If it does, isolate components: wiring harnesses, control switches, and ignition modules can overheat and emit chemical odors.
Inspect for melting, discoloration, or scorch marks. Smell sources inside the oven include insulation or a failing thermostat. If you spot damaged parts or can’t find the source, call a technician to prevent fire risk.
When to DIY and When to Call a Pro
Because some stove issues are simple and safe to fix yourself while others need professional skills, quickly assess the problem, your comfort with tools, and the risks involved before deciding.
Some stove problems are DIY-friendly, but assess the issue, your tools, and safety before you proceed.
For basic Stove maintenance and Cooking safety, you can tackle clogged burners, loose knobs, or a blown light bulb if you turn off power or gas and follow the manual.
Call a pro for gas leaks, electrical shorts, persistent burning smells, or issues involving parts behind panels.
- You’re confident, have the right tools, and the fix is non-electrical.
- The issue is cosmetic or limited to removable parts.
- You can isolate power or gas and follow step-by-step guidance.
- You detect a gas odor, sparking, or repeated malfunctions.
- The repair requires panel removal, wiring, or safety-system resets.
When unsure, stop and call a licensed technician. It’s cheaper and safer than risking damage or injury, and professionals ensure compliance with codes and warranties.
Frequently Asked Questions
Can Stove Parts Be Recycled or Disposed of Safely?
Yes, you can recycle or dispose of stove parts safely if you follow local recycling guidelines and choose eco-friendly disposal options. Separate metal, glass, and electronic components, and remove hazardous materials like gas connectors or insulation.
Take the parts to a certified facility or appliance recycling program. If you’re unsure, contact municipal waste services or a licensed recycler for pickup or drop-off instructions to avoid contamination and fines.
How Do Appliance Warranties Cover Stove Part Failures?
Like a safety net, an appliance warranty often covers defects and certain stove repairs for a set period, but it won’t cover wear from normal use or accidental damage.
You’ll need to check the terms: some warranties include parts and labor, while others cover only parts. You’ll also need proof of purchase and must follow maintenance rules to keep coverage valid.
Extended plans can broaden protection beyond the manufacturer’s basic warranty.
What Are Common Counterfeit Replacement Parts Risks?
You risk safety hazards, poor performance, and voided warranties when you use counterfeit replacement parts. Counterfeit risks include overheating, electrical shorts, chemical contamination, and premature failure.
You should prioritize genuine identification by checking logos, serial numbers, and supplier credentials, and by comparing materials and weight. If something seems off, don’t install it. Contact the manufacturer or an authorized dealer to confirm authenticity and protect your appliance and warranty.
How Do Regional Gas Codes Affect Stove Installation Parts?
Regional gas codes dictate which parts you must use and how you install them because local regulations set required materials, clearances, and testing procedures. You’ll follow standards for venting, pressure, connectors, and shutoffs, and inspectors will verify compliance.
If you don’t meet local codes, you may face failed inspections, fines, or unsafe operation. Always check with local authorities and use certified parts and qualified installers to ensure compliance.
Are There Smartphone Apps to Monitor Stove Component Health?
Yes, you can use smartphone diagnostic apps to monitor stove component health. Connect compatible smart sensors or Wi‑Fi-enabled parts, and the app can send maintenance alerts for burners, valves, igniters, and sensors.
You’ll get real-time status updates, error codes, usage trends, and push reminders for cleaning or service. You can also share diagnostic logs with technicians for faster repairs and safer, more reliable operation.
Conclusion
Now you know each stove part, what it does, and how to spot problems. Think of it like tuning a lute from the Renaissance, but for modern cooking.
Trust your senses when you notice odd smells, sounds, or behavior, and clean removable parts regularly. Use care with gas, electric, and induction systems, and try simple DIY fixes only if you’re confident.
When in doubt, call a professional to avoid damage or danger. Stay safe, learn how to identify the parts of a stove, and cook on.